
How to connect Sparrow Wallet to your Bitcoin node on Tails
Privacy and security in managing Bitcoin is a priority for many users. Combining Sparrow Wallet with Tails offers a robust solution for those seeking to maximize control over their transactions and funds.
This article provides a detailed, step-by-step guide to connecting Sparrow Wallet to your Bitcoin node using Tails, emphasizing the importance of security and anonymity in the process.
Preparing Tails
Before installing Sparrow Wallet, it’s crucial to prepare Tails to ensure a secure foundation:
- Install Tails: Make sure Tails is correctly installed on your computer. You can find an installation guide on the official website.
- Set up persistent storage (optional): To save Sparrow Wallet and its settings between sessions, you can configure persistent storage on Tails. See the official documentation for more details.
Installing Sparrow Wallet
Installing Sparrow Wallet on Tails requires specific steps due to its focus on security and privacy.

Value 4 value⚡️
If the content has been useful to you, please consider supporting me so that I can create more articles like this. Lightning address (only for Lightning payments): [email protected]
You can visit my article on how to install Sparrow Wallet on TailsOS persistently. There, you will find the step-by-step on how to install it.
You can also install it every time you start the system by following the steps in the official documentation and verifying the software each time.
How Tails manages internet connections
Tails ensures robust security for users by guaranteeing that all internet activities are conducted through the Tor network.

Given that we cannot predict which software will attempt to connect to the network or whether its proxy settings are configured to use the Tor SOCKS proxy appropriately, we adopt an essential security measure: blocking all outgoing traffic to the Internet, except for traffic that goes through Tor.
https://tails.net/contribute/design/Tor_enforcement/Network_filter/
For this purpose, it’s necessary to explicitly configure all applications to use this method, thus ensuring the privacy and security of our users while browsing the Internet.
Therefore, if you want an application to use the Tor network and have internet access, you must configure the following parameters in the application:
- Type: SOCKS5
- Host/Proxy: localhost (or 127.0.0.1)
- Port: 9050
Connect your Bitcoin node to Sparrow Wallet from Tails
The first thing you need to do is to make sure you’re connected to the Tor network; you can follow the wizard that appears when you start Tails.
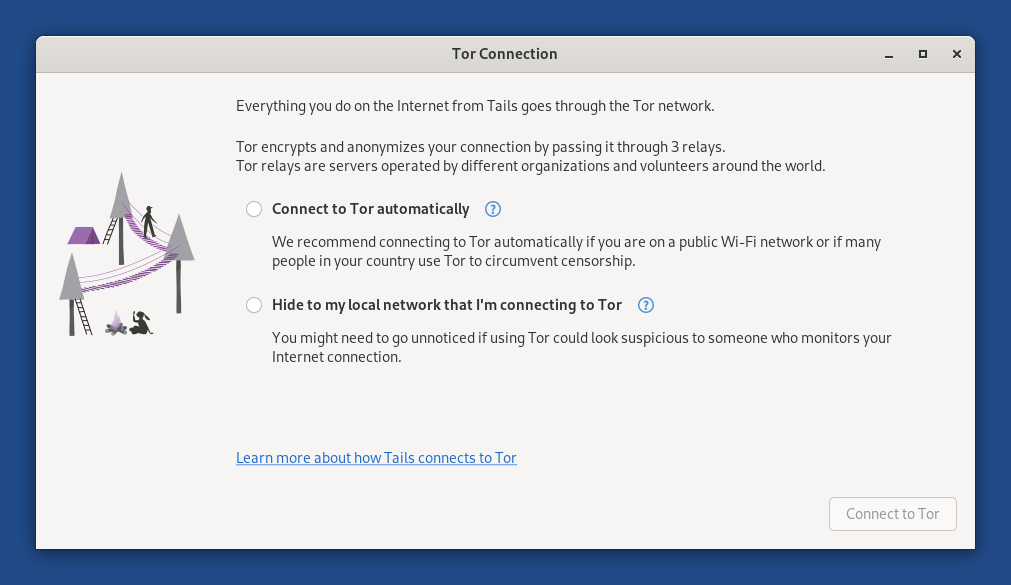
Once connected to the Tor network, you will have access to the internet.
Please ensure that your Bitcoin node is online and that Electrum Server is also online and access is restricted to Tor only. This adds privacy to your infrastructure and allows you to connect to your node anonymously.
The next step is to go into Sparrow’s settings and activate the following parameters inside Server preferences:
Use proxy: enabled
Proxy URL: localhost (or 127.0.0.1)
Port: 9050
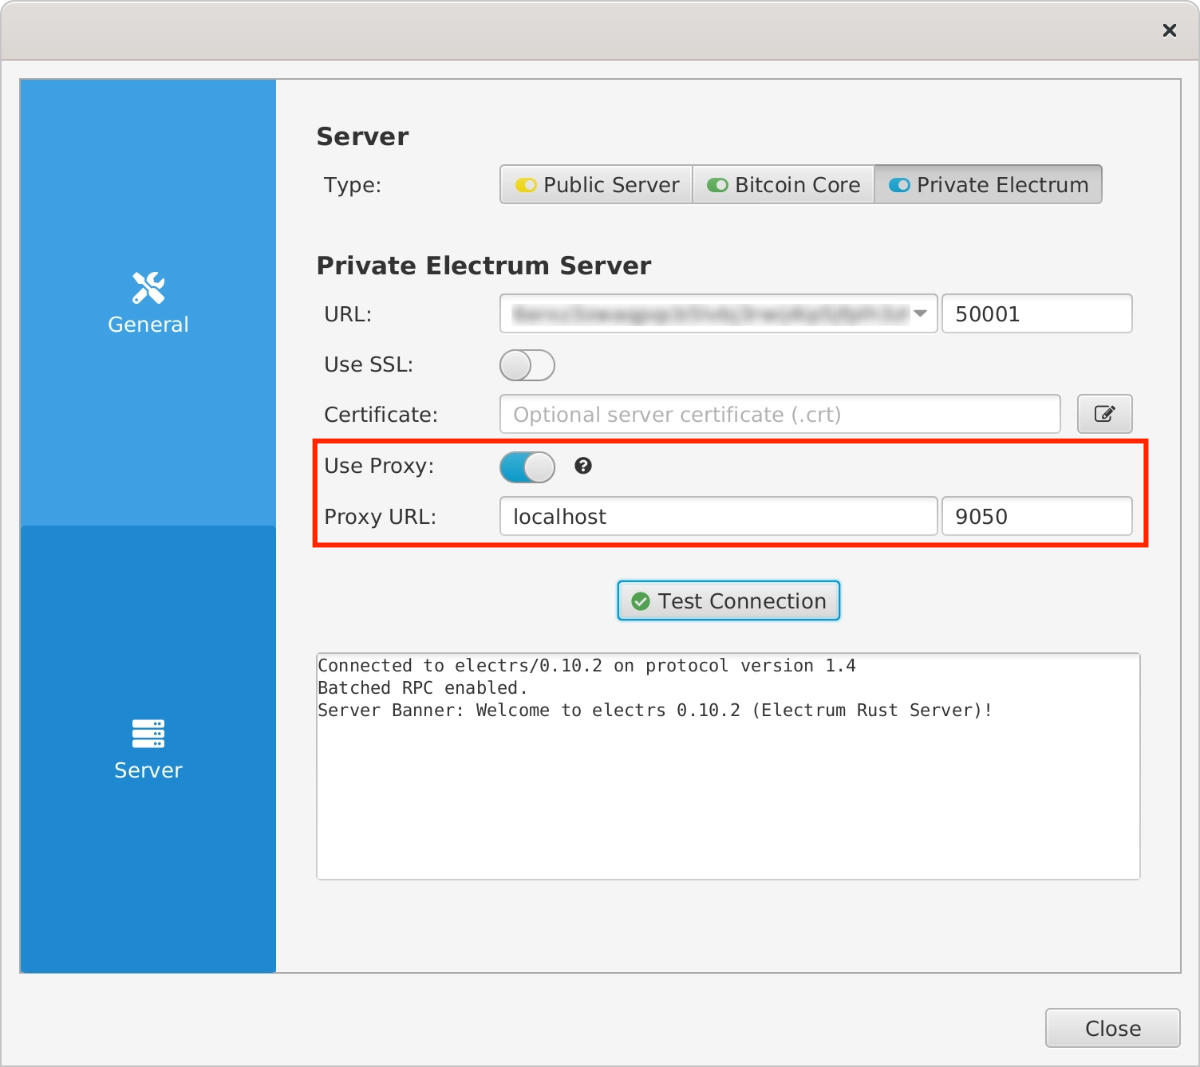
Finally, select Private Electrum and enter your node’s onion address and port. To avoid the mistake I made, do not enter the protocol (http:// or tcp://) in the onion URL, just enter the address followed by .onion.
You can test this by clicking on Test connection.
The same configuration applies whether you’re connecting to your node via Bitcoin Core or to a public server.
Conclusion
Connecting Sparrow Wallet to your Bitcoin node using Tails is a crucial step for those who value privacy and security in managing their bitcoin. This article has guided you through the process, from the initial preparation of Tails to the detailed setup of Sparrow Wallet to use it from Tails.
The importance of verifying software and properly configuring applications to use the Tor network cannot be overstated, ensuring that all online activity is conducted with the highest security. By following the detailed steps in this article, users can establish a secure and private connection to their Bitcoin node, leveraging the unique capabilities of Tails and Sparrow Wallet.
I hope this guide has provided you with the necessary knowledge to perform this setup confidently, and I encourage you to continue exploring ways to enhance the security and privacy of your Bitcoin transactions.


Hola Daniel, muchas gracias, as I understand it, you’ve built a hardware wallet, with this to gread sparrow and tail tools. With this solution you don’t depend on any hardware wallet manufacturer, it’s a solution that can be cloned to as many live as you want, and it’s much more discreet than commercial hardware wallets… darthcoin told about this …
Yes! Darthcoin is the master here 🙌. This solution has some similarities with a hardware wallet but is still a software wallet and is not secure to save your private key on the PC as may have outside world connection (not airgapped). This setup would be great to use with the seedsigner device or some hardware wallet to keep your seed always secure.