How to install LNbits and fund it with Phoenixd on a VPS with Ubuntu
This guide walks you through the installation and configuration of LNbits and Phoenixd on a VPS running Ubuntu. LNbits is an open-source wallet and payment server designed for managing Bitcoin Lightning Network wallets, while Phoenixd is a lightweight Lightning Network node built for efficient liquidity management.
This combination is powerful for those looking to maintain self-custody of their Lightning funds while handling payments easily. By exposing your setup to the clearnet, you can enable easier access for clients or services but must ensure proper security measures to protect your funds and server.
⚠️ Warning: it goes without saying, but this guide doesn’t go into the necessary security steps in detail, and can’t take on liability for any things breaking or losing funds.
Ensure you don’t get reckless, start with small funds you’re ok to lose. Keep an eye on developments or in touch with the active Telegram groups, to get news and updates with low delays. Also, would recommend to do those steps with a peer, so you follow a second pair of eye review. Lastly, 2FA / yubikeys are your friends!
1. Requirements
For this guide we need:

Value 4 value⚡️
If the content has been useful to you, please consider supporting me so that I can create more articles like this. Lightning address (only for Lightning payments): [email protected]
- Some basic knowledge of Linux commands
- Virtual Private Server (VPS). You can get one on Lunanode or Digitalocean (free $200 in credit over 60 days)
- A domain name (or a sub-domain)
2. Setup VPS
To setup your Ubuntu Server VPS, please refer to this guide:
3. Adding Phoenixd
Phoenixd is a minimal, specialized Lightning node designed for developers and businesses to easily send and receive Lightning payments. It runs on a server, uses an HTTP API, and features automated liquidity management, making it ideal for use cases like merchant payments and crowdfunding.
Phoenixd focuses on simplifying interactions with the Lightning Network while maintaining self-custody, with no need for channel or peer management. Upon setup, it generates a 12-word recovery phrase to secure funds.
3.1 Install Phoenixd:
# Create directory
$ mkdir phoenixd
$ cd phoenixd

# Install
$ wget https://github.com/ACINQ/phoenixd/releases/download/v0.3.3/phoenix-0.3.3-linux-x64.zip
$ unzip -j phoenix-0.3.3-linux-x64.zip

# Run the daemon: that's it!
$ ./phoenixd
3.2 Backup your seed
After installation and first run, make sure to do a seed backup or you risk losing your funds. Please store this offline.
cat ~/.phoenix/seed.dat3.3 Create & run Phoenixd service
Running Phoenixd as a system service ensures that it automatically starts with your server and is properly managed by the system. It increases reliability by enabling automatic restarts in case of crashes or reboots, making sure Phoenixd is always available to handle Lightning transactions without manual intervention.
Create a new file for the service:
sudo nano /etc/systemd/system/phoenixd.serviceAdd the following content:
[Unit]
Description=phoenixd
After=network.target

[Service]
ExecStart=/home/<your-user>/phoenixd/phoenixd
WorkingDirectory=/home/<your-user>/phoenixd
User=<your-user>
Restart=always
TimeoutSec=120
RestartSec=30

[Install]
WantedBy=multi-user.target
Run service:
sudo systemctl daemon-reload
sudo systemctl start phoenixd
sudo systemctl enable phoenixd
4. Adding LNbits
LNbits is an open-source, lightweight wallet and payment server designed to work with the Bitcoin Lightning Network. It provides a flexible, extensible platform for developers and businesses to create and manage multiple Lightning wallets, handle micropayments, and build custom applications or services.
LNbits offers a modular architecture with various plugins to add features like paywalls, point-of-sale systems, and tipping services. It aims to make interacting with the Lightning Network simple and adaptable while maintaining the benefits of self-custody.
4.1 Install LNbits:
To install LNbits please refer to https://docs.lnbits.org/guide/installation.html. I’ll describe how I installed using Poetry and SQLite.
It is recommended to use the latest version of Poetry. Make sure you have Python version 3.12 or higher installed.
python3 --versioncurl -sSL https://install.python-poetry.org | python3 -
# Once the above poetry install is completed, use the installation path printed to terminal and replace in the following command
export PATH="/home/<your-user>/.local/bin:$PATH"git clone https://github.com/lnbits/lnbits.git
cd lnbits
git checkout main
poetry install --only main
cp .env.example .envpoetry run lnbits
# To change port/host pass 'poetry run lnbits --port 9000 --host 0.0.0.0'
# adding --debug in the start-up command above to help your troubleshooting and generate a more verbose output
# Note that you have to add the line DEBUG=true in your .env file, too.4.2 Create & run LNbits service
Setting LNbits as a service ensures the same benefits as Phoenixd. It will automatically start with your VPS, recover from crashes, and maintain uptime, allowing uninterrupted wallet management and payments. By running it as a service, you simplify maintenance and reduce the chance of manual errors or downtimes.
Create a new file for the service:
sudo nano /etc/systemd/system/lnbits.serviceAdd the following content:
[Unit]
Description=LNbits
# you can uncomment these lines if you know what you're doing
# it will make sure that lnbits starts after phoenixd (replace with your own backend service)
Wants=phoenixd.service
After=phoenixd.service

[Service]
# replace with the absolute path of your lnbits installation
WorkingDirectory=/home/<your-user>/lnbits
# same here. run `which poetry` if you can't find the poetry binary
ExecStart=/home/<your-user>/.local/bin/poetry run lnbits
# replace with the user that you're running lnbits on
User=<your-user>
Restart=always
TimeoutSec=120
RestartSec=30
Environment=PYTHONUNBUFFERED=1

[Install]
WantedBy=multi-user.target
Run service:
sudo systemctl daemon-reload
sudo systemctl start lnbits
sudo systemctl enable lnbits
4.3 Setup Nginx
Setting up Nginx acts as a reverse proxy, which handles web traffic and routes it to your LNbits server running locally on your VPS. Adding SSL encryption with a certificate from Let’s Encrypt ensures that any data transferred between users and the server is secured, protecting sensitive information like wallet credentials and transactions. This is critical when exposing services to the clearnet.
ℹ️ Before doing the Nginx setup you need to point your domain to the VPS server.
👇 Replace your-domain.com with your real domain name.
Install Nginx:
apt-get install nginx certbotCreate a SSL certificate with LetsEncrypt:
certbot certonly --nginx --agree-tos -d your-domain.comCreate an nginx vhost at /etc/nginx/sites-enabled/your-domain.com:
cat <<EOF > /etc/nginx/sites-enabled/your-domain.com
server {
    server_name your-domain.com;

    location / {
        proxy_pass http://127.0.0.1:5000;
    }

    proxy_set_header Host $host;
    proxy_set_header X-Forwarded-Host $host;
    proxy_set_header X-Forwarded-Proto $scheme;

    proxy_set_header X-Real-IP $remote_addr;
    proxy_set_header X-Forwarded-For $proxy_add_x_forwarded_for;
    proxy_pass_request_headers on;

    # WebSocket support
    proxy_http_version 1.1;
    proxy_set_header Upgrade $http_upgrade;
    proxy_set_header Connection "Upgrade";

    listen [::]:443 ssl;
    listen 443 ssl;
    ssl_certificate /etc/letsencrypt/live/your-domain.com/fullchain.pem;
    ssl_certificate_key /etc/letsencrypt/live/your-domain.com/privkey.pem;
    include /etc/letsencrypt/options-ssl-nginx.conf;
    ssl_dhparam /etc/letsencrypt/ssl-dhparams.pem;
}
EOF
Restart nginx:
service restart nginx4.4 LNbits initial setup
Here we’ll activate the Admin UI inside LNbits to have a nice UI to tweak. So the first step is to activate the Admin UI:
$ sudo systemctl stop lnbits.service
$ cd ~/lnbits
$ sudo nano .env
Set:
LNBITS_ADMIN_UI=trueNow start LNbits once in the terminal window:
$ poetry run lnbitsAfter that, you can obtain the Super User ID:
$ cat data/.super_user
123de4bfdddddbbeb48c8bc8382fe123
You can access your super user account at your-domain.com/wallet?usr=super_user_id.
After accessing, you will find the Server section under Manage.
Here you can design the interface, it has TOPUP to fill wallets and you can restrict access rights to extensions only for admins or generally deactivated for everyone. You can make users admins or set up Allowed Users if you want to restrict access. And of course the classic settings of the .env file, e.g. to change the funding source wallet or set a charge fee.
After doing the setup, do not forget to start the service again:
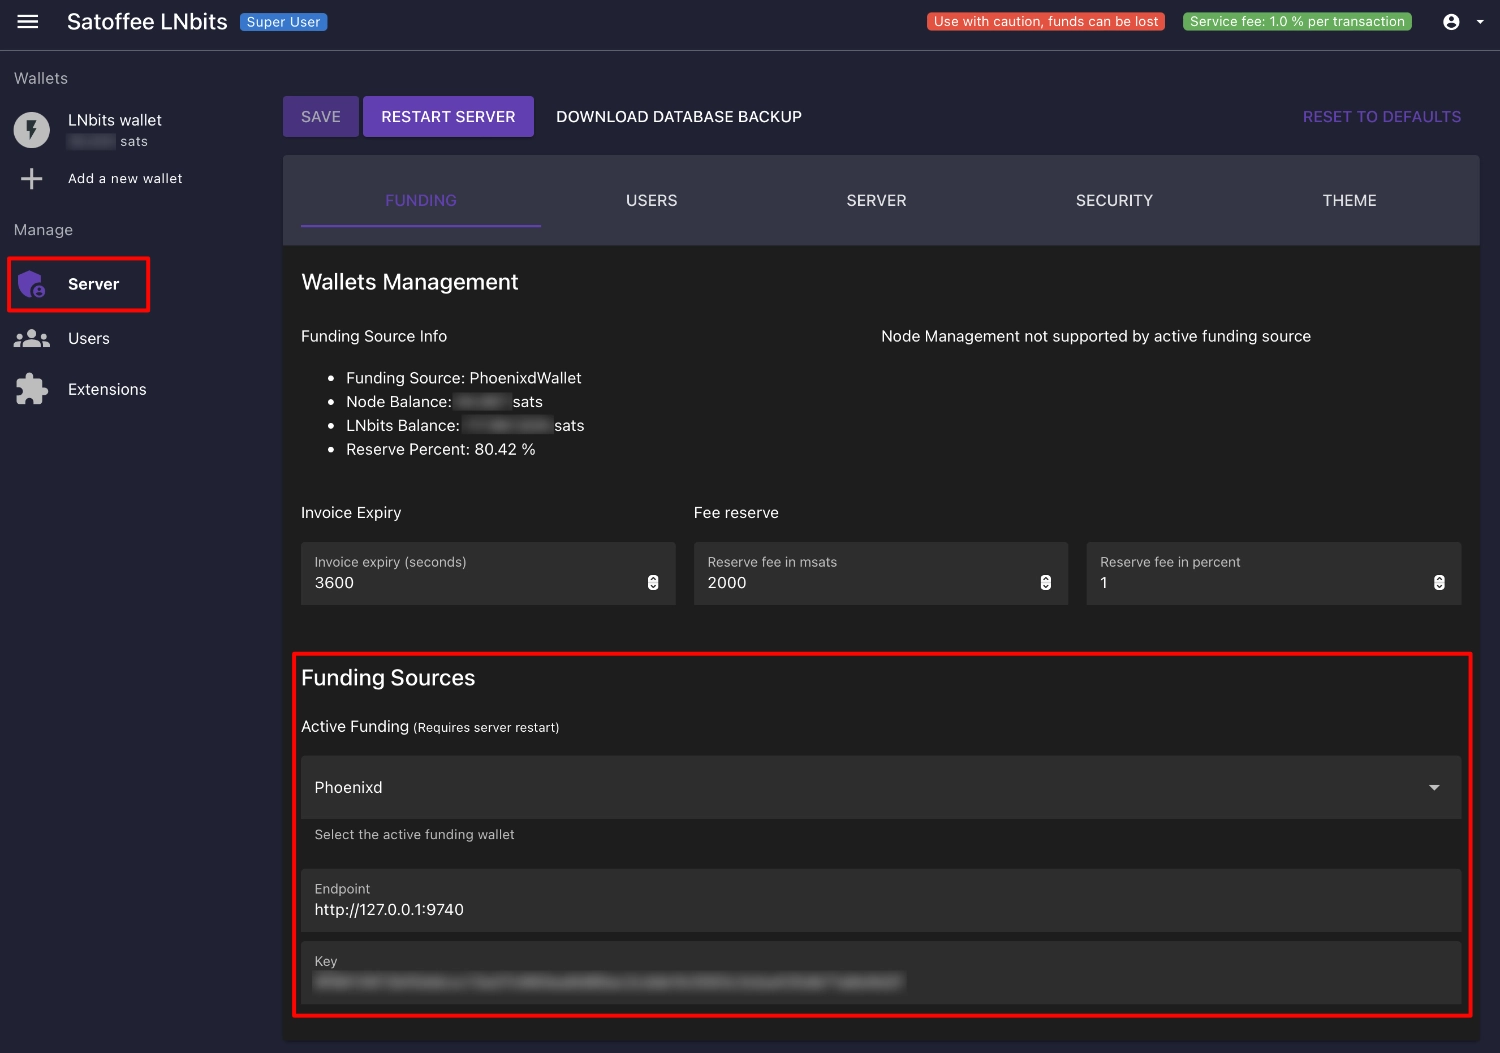
sudo systemctl start lnbits.service4.5 Add Phoenixd as a funding source
Go to Server / Funding / Funding Sources and select Phoenixd, fill:
- Endpoint: http://127.0.0.1:9740
- Key: your Phoenixd API password (
http-password) from:
cat ~/.phoenix/phoenix.confSave and restart server.
5. Open your first channel in Phoenixd to start receiving payments
Please read:
Note: In newer versions of Phoenixd there will be a new command to check for fees before opening a new channel /getfees --2M
On Phoenixd the first payments are used for the service/mining fees of the auto-liquidity and no channel is opened until these fees are payed.
Follow this steps for opening the first 2M sats channel:
- Enter the LNbits superuser account.
- Create invoice for 30,000 sats (please estimate amount as stated on auto-liquidity docs).
- Pay invoice with an external wallet.
- Use the Phoenixd command line to check if the channel is opened with
/listchannelsor/getinfo.
# Check if channel is opened
$ ./phoenix-cli getinfo

{
    "nodeId": "...",
    "channels": [
        {
            "state": "Normal",
            "channelId": "...",
            "balanceSat": 7074,
            "inboundLiquiditySat": 2011465,
            "capacitySat": 2022294,
            "fundingTxId": "..."
        }
    ],
    "chain": "mainnet",
    "blockHeight": 858977,
    "version": "0.3.3-4e805ad"
}
The cannel capacity is 2,022,294 sats and the opening fees were 30,000 – 7,074 = 22,926 sats with mempool at 6sat/vB.
5.1 Turn off auto-liquidity feature in Phoenixd
After opening the first 2M channel successfully, we’ll disable the auto-liquidity feature to avoid new channel openings/fees.
Edit phoenix.conf and add auto-liquidity=off:
$ nano ~/.phoenix/phoenix.conf

# Add auto-liquidity setting to off
auto-liquidity=off
http-password=...
http-password-limited-access=...
webhook-secret=...
Reset the service:
sudo systemctl restart phoenixd6. Create a regular user account and start using LNbits
At this point, your channel with Phoenixd is active. It’s highly recommended that you create a regular user account instead of continuing to use the super admin account for daily operations. This way, you can safely start using LNbits to receive payments, connect devices, and explore its features without compromising the security of your administrative access.
To create a regular user account:
- Log out from your super admin account.
- Visit your LNbits instance (e.g.,
your-domain.com). - Sign up as a new user, and create your wallet.
- Begin receiving payments, configuring extensions, and connecting devices.
Now, you’re ready to fully utilize LNbits with Phoenixd!
7. Verify running services
Create a script to check running services:
nano ~/check_services.shAdd the following content:
#!/bin/bash
if systemctl is-active --quiet phoenixd; then
    echo "phoenixd is running."
else
    echo "phoenixd is not running."
fi

if systemctl is-active --quiet lnbits; then
    echo "LNbits is running."
else
    echo "LNbits is not running."
fi

if systemctl is-active --quiet nginx; then
    echo "Nginx is running."
else
    echo "Nginx is not running."
fi
Make the script executable and run it:
chmod +x ~/check_services.sh
~/check_services.sh
8. Backups
It’s important to do backups of your server. In this case we are using LNbits with the default SQLite database. If you use PostgreSQL you also need to do a backup there.
To backup LNbits we are going to copy ~/lnbits/data folder.
To backup Phoenixd we’ll copy the files inside ~/.phoenix leaving seed.dat outside the backup. This file is very sensitive and must be secured in other way as it includes the access to your funds.
9. Maintain & update your server
9.1 Update Ubuntu Server
When you login to your VPS you can see in the terminal window if new updates for Ubuntu are available. To perform updates please do:
sudo systemctl stop lnbits.service
sudo systemctl stop phoenixd.service
sudo su -
apt update && apt upgrade -y
reboot
9.2 Update Phoenixd
Simply replace the binary and restart the daemon. Phoenixd inherits from the same simplicity as the mobile version, upgrades are fully transparent.
9.3 Update LNbits
Stop LNbits and perform update:
sudo systemctl stop lnbits.service
cd ~/lnbits
git pull --rebase
poetry self update
poetry install --only main
Restart LNbits and read logs:
sudo systemctl start lnbits.service
sudo journalctl -u lnbits -f --since "2 hour ago"
Check if your LNbits server was started correctly in the logs (journal) and on the website.
Possibilities to check the version
If the update was successful, you can see on the LNbits website at the bottom left. There you can see e.g.
LNbits version: 0.12.9
You can check which “version” is current. Execute the command $ git show. As result you get Merge pull request #1234 .... This is the number of the last pull request that was merged. If you now go to the GitHub page of LNbits, you can see there which PR was the last merge. This is a good way to see how far behind you are. You can get out of “git show” with key q.
Are new functions added? Then check the .env file
With an update only the code of LNbits is updated, but not your database or configuration file .env. If there were changes / extensions, you must check independently or take the file from the .env.example as a template and create the .env again. You could compare the content very well by opening the .env file once with $ sudo nano ~/lnbits/.env and looking in a second window at the last .env.example state on GitHub.
After any changes applied on the .env file restart LNbits with
sudo systemctl restart lnbits.service10. Security warning
This guide focuses on the technical aspects of setting up LNbits and Phoenixd, but it does not dive deeply into the necessary security measures. You are responsible for ensuring that your setup is secure. To help protect your funds and server, follow these important guidelines:
- Use Strong Passwords: Ensure that all system users and services (like LNbits and Phoenixd) use strong, unique passwords. Consider using a password manager to store them securely.
- Enable Two-Factor Authentication (2FA): Use 2FA wherever possible to secure access to your server and services like LNbits. Yubikeys or apps like Google Authenticator can help add an extra layer of protection.
- Configure a Firewall (UFW): Install and configure a firewall, like
ufw(Uncomplicated Firewall), to restrict incoming and outgoing traffic to only the necessary services. This can prevent unwanted access to your server. - Regularly Monitor Logs: Keep an eye on your server logs (e.g., Nginx, LNbits, Phoenixd) for any suspicious activity or unexpected errors. This can help you detect potential security breaches early.
- Keep Your Server and Software Updated: Regularly update your Ubuntu system and installed software (LNbits, Phoenixd, Nginx, etc.) to ensure you’re protected against the latest vulnerabilities.
- Use SSL (HTTPS): Ensure that your server is only accessible over HTTPS, with a valid SSL certificate. This encrypts communication between users and your server, preventing sensitive data from being intercepted.
- Backup Regularly: Backup your LNbits database and Phoenixd configuration (excluding seed files) regularly. Make sure your backup locations are secure and that you have offline backups for critical data like your Phoenixd seed.
- Monitor Security Developments: Keep up to date with security developments in the Lightning and Bitcoin ecosystems by joining Telegram groups or forums. This way, you’ll be alerted about any vulnerabilities, best practices, or new tools.
11. Additional documentation and sources
Docs
- Phoenixd docs https://phoenix.acinq.co/server/get-started
- LNbits docs https://github.com/lnbits/lnbits/wiki/LNbits-Documentation
- LNBits installation https://docs.lnbits.org/guide/installation.html
Guides
- LNbits on Phoenixd by Yvette https://github.com/arbadacarbaYK/LNbits.on.phoenixd.on.MacOS/blob/main/Ubuntu.md
- LNbits server by Axel Hamburch https://ereignishorizont.xyz/lnbits-server/en/
- VPS LNbits by Trezor Hannes https://github.com/trezorhannes/vps-lnbits?tab=readme-ov-file